Life in frames / Film production, postproduction & motion design

Advanced DSLR Footage Stabilization using Adobe After Effects

Learn how to stabilize DSLR footage and correct the rolling shutter issues using Adobe After Effects CS4

AFSDSLR_en

Introduction

Sometimes you have shaky footage from a handheld camera or shot from a tripod or other device that needs to be stabilized.

In case of most prosumer and consumer cameras the flaws of the shaky footage are limited to the X and Y offset that is pretty easy to correct. However in case of HDSLRs and other CMOS-based digital cameras the situation becomes more complicated as the rolling shutter effects appear and make it difficult to stabilize the footage using the most popular plugins.

DSLR and CMOS based cameras dedicated stabilizing plugins

There’s one good combination of plugins helping you to stabilize the shaky footage and solve the rolling shutter issues. These are the Core Melt’s Lock and Load plugin and The Foundry Rolling Shutter Plugin. Unfortunately the price of the RollingShutter Plugin is pretty high (around USD 500). Lock and Load is cheaper (USD 150) and seems to be a good solution. You’ll find the tests and comparison here:

The Jedi Way

During my recent project, a promo film for Michał Zygmunt, I wanted to use a few shots that were shot using the tripod set on the lever and w/out any stabilization. Pretty shaky and the situation looked difficult, especially because I didn’t have the plugins mentioned above nor the budget for them. So after a short consideration I decided to choose the Jedi Way. I reached back to the math basics and found the solution using a naked Adobe After Effects CS4 and a bit of scripting. The results are pretty pleasing.

A bit of theory

So how to correct the rolling shutter effect?

  1. Apply motion tracking using 1 tracker and 2 points as if you were to perform the basic X/Y stabilization. Place the tracking points close to the top and bottom edges of the tracked image.
  2. Find the straight line between 2 tracker’s points and its slope. To calculate the slope you’ll need the arcus tangent function and the coordinates of 2 tracker’s points. The angle calculated that way is useful to normalize the results in further steps as well as to deskew the image.
  3. Calculate the alpha angle (the slope) for each of the frames of the footage that needs to be stabilized.
  4. Stabilize the footage in X/Y axes in an usual way using a single point tracker located near to the center of the frame.
  5. Apply the Transform/Skew Effect to the footage and bind the skew angle to the normalized alpha angle. Normalized means here that we want the angle to reflect just the skew changes, not the constant angle between the tracking points and the coordinates system. So you need to substract the alpha angle calculated for the first frame of the footage or the averaged angle calculated for all frames.

The alpha angle of a straight line (the slope) is calculated as follows:

alpha = arctan ((|x1 - x2|) /  (|y1 - y2|))

The scripting expression that we need to apply to the skew effect is as follows (fixed after your feedback):

skewAngle = (radiansToDegrees(Math.atan(
        Math.abs(
                (motionTracker("Tracker 1")("Track Point 1").featureCenter[0]
                - motionTracker("Tracker 1")("Track Point 2").featureCenter[0])
        )
        / Math.abs(
                (motionTracker("Tracker 1")("Track Point 1").featureCenter[1]
                - motionTracker("Tracker 1")("Track Point 2").featureCenter[1])
        )
))-a)*(-1)

Where:

  • skewAngle is an angle that needs to be applied to deskew the image
  • a is an angle between the straight line connecting two tracker’s points and the Y axis calculated for the first frame of the footage or averaged across the whole clip
  • motionTracker(“Tracker 1″) is a reference to the tracker
  • (“Track Point 1″).featureCenter[0] is an X coordinate of the first tracker’s point
  • (“Track Point 1″).featureCenter[1] is an Y coordinate of the first tracker’s point
  • (“Track Point 2″).featureCenter[0] is an X coordinate of the second tracker’s point
  • (“Track Point 2″).featureCenter[1] is an Y coordinate of the second tracker’s point

The expression needs to be multiplied by a -1 constant as we want to deskew the image by the calculated skew value.
The Math.atan function returns a value in radians, so we need to convert it to degrees using the radiansToDegrees function.
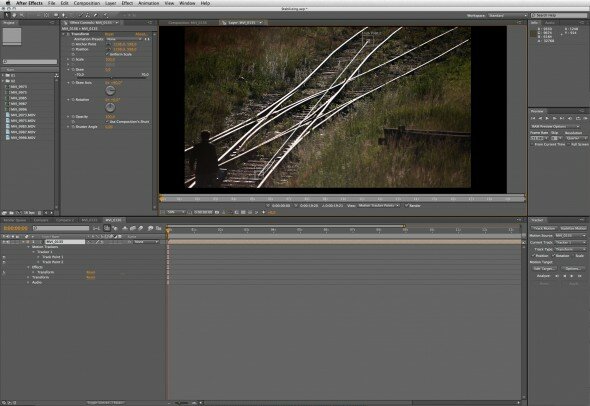
The practice

  1. Create a new comp exceeding the size of the footage.
  2. Drag and drop the footage to the comp and center it to the stage.
  3. Run the tracker using 1 tracker point X/Y stabilization.
  4. Hit analyze and apply stabilization to the footage. I assume we don’t need the rotation stabilization here.
  5. Create a new comp and drop the previous one onto the stage (or simply nest the first sequence).
  6. Create another tracker, this time using 2 points (check the rotation checkbox as well).
  7. Locate the two tracker points close to the top and to the bottom of the frame on static parts of the picture.
  8. Analyze, but do not apply any stabilization.
  9. Apply the Transform Effect to the tracked layer.
  10. Find MyClip > Effects > Tranform > Skew property in the left panel of the timeline and alt-click the clock (animate property) icon to pop the expression textfield.
  11. Paste the following script into the skew property expression input text field (fixed after your feedback):
    (radiansToDegrees(Math.atan(
            Math.abs(
                    (motionTracker("Tracker 1")("Track Point 1").featureCenter[0]
                    - motionTracker("Tracker 1")("Track Point 2").featureCenter[0])
            )
            / Math.abs(
                    (motionTracker("Tracker 1")("Track Point 1").featureCenter[1]
                    - motionTracker("Tracker 1")("Track Point 2").featureCenter[1])
            )
    ))-0)*(-1)
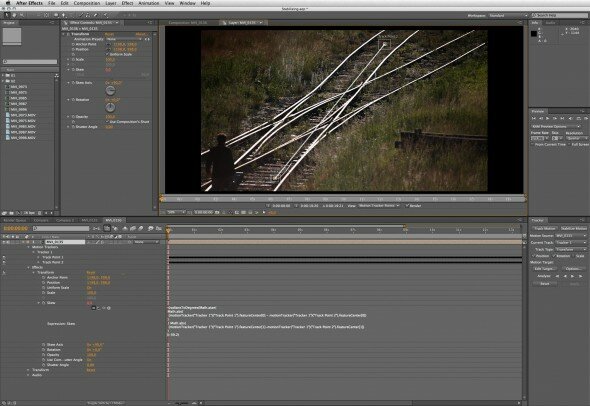
  12. If your tracker is labeled “Tracker 1” and has 2 tracker points nested that are labeled “Track Point 1” i “Track Point 2” (this is the default setting) you don’t have to modify anything. Otherwise, you need to modify the script variables to match your tracker name and tracker point coordinates.
  13. Set the playhead on the first frame and readout the skew value that turned red. It should reflect the slope of the straight line between the tracker points and the Y axis.
  14. Enter this value in place of 0 at the end of the script.
  15. Crop the footage and export.

The results

Here are the results. The clip shows the raw, unstabilized and shaky footage, the stabilized footage, and finally the stabilized and deskew footage.

6 Responses to “ Advanced DSLR Footage Stabilization using Adobe After Effects”

  1. Mike says:

    On the last shoot U should just use a good tripod;)

  2. Patryk Kizny says:

    Michał, Thank you for your advice. However I think you missed one detail. Let me explain by posting a small BTS image ;)
    Lever

  3. Patricio Londaits says:

    I get an error when I paste the script it says “Function Math.athan() is undefined”

  4. Joshua says:

    Didn’t work for me as well as it did for you… Maybe I got the formula wrong, not sure. I had better results with deshaker. Thanks for posting the tutorial nonetheless.

  5. Joshua says:

    The code that is posted definitely does not work. It yields an error. I had to check the image to extract the proper formula. I think my problem was the value in red to be copied and inserted into the formula. My number was 0.1 and it didn’t seem to do very much….

  6. Patryk Kizny says:

    OK, I have checked the code and, indeed, there was a syntax error. I fixed it and you’ll find the right code in the post body. Apologies for my mistake.